In this lesson we look at connecting to a standard wireless network in Windows.
To access the internet you must be connected to a network. Often nowadays these networks are wireless, also sometimes called WiFi.
Use the buttons below to navigate through the lesson


When you connect to a wireless network you are connected to a nearby box called a router. These routers have limited wireless range so you often have to be close to the router and not have too many obstacles between your computer and the router.
Once you are connected to the router it acts as a gateway to the internet for your computer.
In order to connect, you look for the Wireless Network icon. This is usually in the bottom right tray of your computer near the clock, and usually looks something like this: ![]()

When you click your wireless network icon it shows you a list of available networks. This looks different in every version of Windows but always shows the network name and how strong the connection is to it:
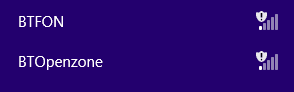
You can choose a network to connect to from the list.
If it is a secure network it will ask you for a password.
If it is unsecured it will simply connect. The unsecure networks are shown with warning symbols, often an exclamation mark “!”.
![]()
If in doubt you should avoid using unsecure networks. This is because someone may have maliciously set up the router to spy on your internet usage, and you cannot tell for sure. You should only connect to wireless networks that you trust!

